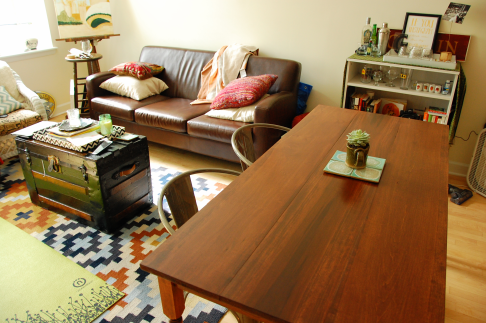
Yes, I’m finally getting to the end of this project! In case you’re just joining, my husband and I created a dining room table and a bench for ourselves in order to save money while also making something with a custom size. The process has been long, but I am happy to say the project is finally finished!
Final step: Staining the table
Since it’s made of poplar, I needed to use wood conditioner prior to staining, otherwise my stain could have turned out very blotchy. This article gives a good run down for how to stain poplar wood. I went with MinWax Pre-Stain Wood Conditioner.
After a good sanding and applying the conditioner, it was time to stain! I went with Varathane Wood Stain in American Walnut. It advertises “no need” for a pre-stain conditioner (even though with Poplar you still should) and gets a richer color in only one coat. I used Varathane Polyurethane in a semi-gloss to finish and protect the table.
My results were beautiful! I loved the color right away, and the stain was easy to apply. The wood conditioner did its job and there are no blotchy sections, which I was really worried about since poplar is used almost entirely to paint on. I only did one coat of stain with a brush, then wiped it off after about two minutes. After letting the table dry overnight, I applied three coats of the polyurethane. In between the second and third coats, I lightly sanded parts of the table that felt rough with a fine sandpaper (220 grit).
Even though this project took almost 3 months, it was worth it to have something custom for our space and we saved so much money! Here’s the breakdown:
- Poplar wood, screws, and wood glue for main table: $55
- Reclaimed wood, pipes, and fittings for bench: about $50
- 2 dining room chairs: Goodwill find by my mother, only $50 for both
- Conditioner, stain, polyurethane, a brush an rags: $38
- Total cost: $193
Under $200 dollars for a custom sized table that seats up to 6 comfortably? Not bad.
Tips:
- Stain outside if possible, but it’s okay to polyurethane inside, as the fumes were very minimal
- In some spots I didn’t sand the wood glue reside enough, and glue does not take stain. They’re not in noticeable places, but if it’s going to bother you, spend extra time there when sanding
- I forgot to buy both mineral spirits and gloves, which made stain clean-up very interesting. However, during my cleaning adventure, I learned that Soft Scrub (without bleach, please) also does the trick on both brush and hands, (and subsequently the wash tub in community basement/laundry room, which I also had to clean)
- The polyurethane requires a full week to fully cure and be used normally, so give yourself some time if planning on a dinner party or something
- My favorite thing about this stain is the dimension of the color. In different lighting, the table takes on either a brighter more red infused or a darker more brown infused, which fits all the different colors and textures of my space well!
What have been some of your favorite home projects?
Lydia Jane
Poplar – Home Depot
Reclaimed bench wood – Rebuilding Exchange
Stain in American Walnut
Dining room chairs – Goodwill, originally from Target


Looks amazing!
LikeLike
[…] that the dining room is finally complete, it’s time to start a new project! I recently went to the Randolph Street […]
LikeLike
Looks great! I love the contrast between the warm wood and the cooler, more industrial metal chairs.
LikeLike
[…] Dining Room Table DIY […]
LikeLike
[…] aspects of the space that weren’t working for us by building a media console, building a dining room table and bench, adding a bar, and simple decorating. Up until recently, we felt we’d hit a wall with what we […]
LikeLike
[…] of the projects in the apartment are finished. We’ve made a dining room table, a bench, a TV console, tall shelving units and a headboard (keep an eye out for that post coming […]
LikeLike
[…] projects were put first due to necessity for storage and entertaining like the TV console and the dining room table. Finally though, we made ourselves a headboard. It makes a big […]
LikeLike
[…] done. We’ve created or bought furniture for almost every spot needed, (here, here, here, and here), so it’s just tweaking at this point. That doesn’t mean we’re done, but it does […]
LikeLike
The wood would have looked much better with some mineral oil and poly rather than soaked in a stain.
LikeLike
If I make another one in the future I’ll keep that in mind! Would that be your recommendation because it’s pine? Or because that’s your preference? I didn’t want it to be too light since we have light floors.
LikeLike